Tuesday night (12/02/2008), one harddisk on Toyota’s server going down. That disk located in the mirror which build using Veritas Volume Manager. Toyota is my office’s biggest & carping customer. So many people in my office going busy with this accident. From Tuesday night I’m as support engineer have made the manual procedure for replacing the failure disk. But guess what? They prefer to ask the Veritas engineer rather than follow my procedure. So why bothering me call me and report the problem? Why they didn’t ask the expert only? I think engineer like me only used for physical work beside troblesho0ting things.
Maybe all the manager in my office get this lesson : “don’t trust your engineer, ask the expert only”.
Finally, we replaced the broken disk at Wednesday night. With all
eyes on me, I executed the replacing procedures. The broken disk is the
rootmirror disk in SunFire V890. The procedure for replace rootmirror disk which hold by Veritas Volume Manager (VxVM) is like this :
- Check the status of all disks that hold by Veritas Volume Manager using :
# vxdisk listUsing this command for locate which disk that failed. See the following illustration :
- Check whether the failed disk can be remove from the operating system (in Toyota case, the OS is Solaris 9/04) :
# luxadm remove_device /dev/rdsk/c1t2d0s2
If that command cannot be executed, you may just pull out the disk from the server. After that you must replace the disk with the new one as soon as possible. - Run
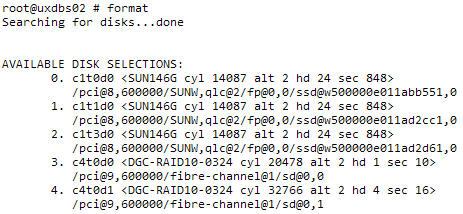
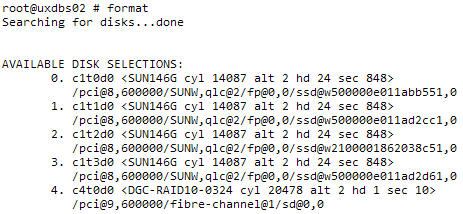
devfsadmandcfgadm -c configure c2from Solaris OS to let the system know the new disk. In Toyota case, the failed disk located atc1t2d0. See the following illustration before and after the OS knowing the new disk :

- Try to see all the disk using
formatcommand. If the new disk has been appears, you mustlabelthe disk. - Run the
vxdctl, this is the command for let the VxVM knows all the devices that connected to the server (including the new attached devices). - Run the
vxdiskadm(disk configurations menu of VxVM), using this command :
# vxdiskadmSee the following illustration :
- Choose the fourth menu in the
vxdiskadmwhich is"Remove a disk for replacement".Choose this menu by type “4″ in thevxdiskadmmenu. Program will see the failed disk that has been remove from VxVM menu. Choose that disk for removal process. In Toyota case, the failed disk wasrootmirror01. See the following illustration :
- After that choose the fifth menu which is
"Replace a failed or removed disk".Choose this menu by type “5″ in thevxdiskadmmenu. By running this program Veritas will know that servers has one new disk that haven’t assign to the Veritas Volume Manager. In Toyota case, VxVM knows thatc1t2d0is the new disk that hasn’t assign into VxVM. They will ask you, whether you want to assign thec2t1d0to berootmirror01. When VxVM ask you toencapsulatedisk, you must reject that. Instead of encapsulate the new disk, you must answer yes when VxVM offer you toinitializethe new disk. See the following illustration :
- Follow the rest of the
vxdiskadmmenu, don’t worry it’s so easy. After that quit the menu. The new disk has been added into VxVM configuration and they start the synchronization betweenrootmirror01with therootdisk01. Compare the list of all disks after disk replacement :

- The synchronization process occured as long 2 hours for 146 GB
disks. We can check the progress of synchronization process using this
command :
# vxtask list
See the following example :
'9. 도서관 > __사. Network' 카테고리의 다른 글
| 솔라리스 cdrom (0) | 2008.11.12 |
|---|---|
| VOIP용어 (SS7, H.323, SIP, RTP, RTCP,MGCP,MEGACO) (0) | 2008.11.10 |
| 클러스터 파일 복원 (0) | 2008.11.10 |
| 클러스터 구성을 백업하는 방법 (0) | 2008.11.10 |
| SPARC: 볼륨을 온라인으로 백업하는 방법(VERITAS Volume Manager) (0) | 2008.11.10 |


댓글